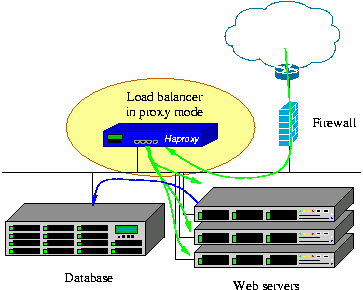
1.HAProxy Description
HAProxy 是一套快速以及靈活的load balance套件,透過haproxy可以快速達到server分流、判斷存活、連線數量等功能。當流量達到一定的程度後load balance是一大重點,如何讓各server平均去負擔流量是相當重要的,透過haproxy可以簡單快速的達成load balance。
2. HAProxy架設
0.環境
OS:RCHE 5.7
Haproxy: 1.4.15VIP:10.55.79.25
HAProxy Server1:10.55.79.153(Master)
HAProxy Server2:10.55.79.154(Slave)
Web Server1:10.55.78.178
Web Server2:10.55.78.179
1.增加使用者及平台設定
#useradd -r haproxy
#vi /etc/sysctl.conf
net.ipv4.ip_nonlocal_bind=1
#sysctl –p
net.ipv4.ip_nonlocal_bind=1
#sysctl –p
2.download haproxy
經測試:
haproxy-1.4.15.tar.gz & keepalived- 1.2.2 .tar.gz 可運作
haproxy-1.4.24.tar.gz & keepalived-1.2.8.tar.gz 可運作
3.install
cd /tmp
tar -zxvf haproxy- 1.4.15 .tar.gz
cd haproxy- 1.4.15
make TARGET=linux26 PREFIX=/usr/local/haproxy
make install PREFIX=/usr/local/haproxy
make install PREFIX=/usr/local/haproxy
4. setup config
#vi /usr/local/haproxy/haproxy.cfg
global
#log 127.0.0.1 local0 ###全局日志,搭配syslog server
maxconn 4096
uid haproxy
gid haproxy
daemon ##背景執行
nbproc 1 ##process運行數,可設定多個process提高效能
defaults
#log 127.0.0.1 local3 ###全局日志,搭配syslog server
maxconn 32768 #最大進線數
clitimeout 60000
srvtimeout 60000
contimeout 5000 #連接超時60s , 單位是ms
retries 3 ##3次連接失敗就認為服務不可用
option httplog #日志類別http日志格式
option httplog #日志類別http日志格式
option forwardfor ##如果後端服務器需要獲得客戶端真實ip需要配置的參數,可以從Http Header中獲得客戶端ip
option httpclose #連線完後關閉http通道
option redispatch ##serverId對應的服務器掛掉後,強制定向到其他健康的服務器
option dontlognull ##不記錄健康檢查的日志信息
option abortonclose #當服務器負載很高的時候,自動結束掉當前隊列處理比較久的連接
option abortonclose #當服務器負載很高的時候,自動結束掉當前隊列處理比較久的連接
listen http_proxy
bind *:80 #監聽端口
mode http #http的7層模式
#balance source ##默認的負載均衡的方式,類似nginx的ip_hash,可以固定session
#balance leastconn #默認的負載均衡的方式,最小連接
balance roundrobin #默認的負載均衡的方式,輪詢方式#balance leastconn #默認的負載均衡的方式,最小連接
log 127.0.0.1 local3 err #[err warning info debug]
option forwardfor
option httpchk HEAD /index.html HTTP/1.0 ###健康檢查頁面
#appsession PHPSESSID len 128 timeout 1h request-learnserver www1 10.55.78.178:80 check weight 1 inter 2000 rise 2 fall 3
server www2 10.55.78.179:80 check weight 1 inter 2000 rise 2 fall 3
#服務器定義,check inter 2000是檢測心跳頻率rise 3是3次正確認為服務器可用,
#fall 3是3次失敗認为服務器不可用,weight代表權重
#errorfile 403 /etc/haproxy/errorfiles/403.http
#errorfile 500 /etc/haproxy/errorfiles/500.http
#errorfile 502 /etc/haproxy/errorfiles/502.http
listen status_auth 10.55.79.153:81 #管理介面
stats enable
mode http
stats uri /admin-status #管理地址
stats auth admin:123456 #管理帐号:管理密码
stats admin if TRUE
listen status_auth 10.55.79.25:81 #VIP管理介面
stats enable
mode http
stats uri /admin-status #管理地址
stats auth admin:123456 #管理帐号:管理密码
stats admin if TRUE
mode http
stats uri /admin-status #管理地址
stats auth admin:123456 #管理帐号:管理密码
stats admin if TRUE
5.Startup/Stop Service
Startup:
Method1(背景執行):
#/usr/local/haproxy/sbin/haproxy -f /usr/local/haproxy/haproxy.cfg
Method2(偵錯模式):
/usr/local/haproxy/sbin/haproxy -d -f /usr/local/haproxy/haproxy.cfg
Stop:
#killall -9 haproxy
3. Syslog Setting
#vi /etc/syslog.conf添加:
local3.* /var/log/haproxy.log
local0.* /var/log/haproxy.log
#vi /etc/sysconfig/syslog修改:
SYSLOGD_OPTIONS="-r -m 0"
#/etc/init.d/syslog restart
4. haproxy壓力測試
先進管理畫面,再確認最後狀態
# for i in $(seq 100);do curl http://10.55.79.153:80;done
5. Keepalive Setting
1.Download
# wget http://keepalived.org/software/keepalived- 1.2.2 .tar.gz
PS.keepalived-1.2.9.tar.gz 會有Bug
2.Install
# tar zxf keepalived- 1.2.2 .tar.gz
cd keepalived- 1.2.2
# ./configure
# make
# make install
# cp /usr/local/etc/rc.d/init.d/keepalived /etc/rc.d/init.d/
# cp /usr/local/etc/sysconfig/keepalived /etc/sysconfig/
# mkdir /etc/keepalived
# cp /usr/local/sbin/keepalived /usr/sbin/
3.Setting
# vi /etc/keepalived/keepalived.conf
! Configuration File for keepalived
global_defs {
notification_email {
shinchuan.huang@innolux.com
}
notification_email_from shinchuan.huang@innolux.com
smtp_server 127.0.0.1
smtp_connect_timeout 30
router_id LVS_DEVEL
}
vrrp_script chk_haproxy {
script "killall -0 haproxy"
interval 2
weight 2
}
vrrp_instance VI_1 {
state MASTER #另一台為BACKUP
interface eth0
virtual_router_id 51
priority 100 #另一台為99
advert_int 1
garp_master_delay 1
authentication {
auth_type PASS
auth_pass 1111
}
virtual_ipaddress {
10.55.79.25
}
track_script {
chk_haproxy
}
track_interface {
eth0
}
}
virtual_server 10.55.79.25 80 {
delay_loop 6 #(每隔10秒查詢realserver狀態)
lb_algo rr #(lvs 算法)
lb_kind DR #(Direct Route)
# nat_mask 255.255.255.0
persistence_timeout 50 #(同一IP的連接50秒內被分配到同一台realserver)
protocol TCP #(用TCP協議檢查realserver狀態)
real_server 10.55.79.153 80 {
weight 1 #(權重)
TCP_CHECK {
connect_timeout 10 #(10秒無響應超時)
nb_get_retry 3
delay_before_retry 3
}
}
real_server 10.55.79.154 80 {
weight 1
TCP_CHECK {
connect_timeout 10
nb_get_retry 3
delay_before_retry 3
}
}
}
4.Start Service
# service keepalived start
使用Ping的方式來做測試,並搭配arp –a的方式,來查看目前是跑在那一台主機上面
7. 開機啟動Script
[root@C5THAP1 haproxy]# vi /etc/rc.d/init.d/haproxy
#! /bin/sh
set -e
PATH=/sbin:/bin:/usr/sbin:/usr/bin:/usr/local/haproxy/sbin
PROGDIR=/usr/local/haproxy
PROGNAME=haproxy
DAEMON=$PROGDIR/sbin/$PROGNAME
CONFIG=$PROGDIR/$PROGNAME.cfg
PIDFILE=$PROGDIR/run/$PROGNAME.pid
DESC="HAProxy daemon"
SCRIPTNAME=/etc/init.d/$PROGNAME
# Gracefully exit if the package has been removed.
test -x $DAEMON || exit 0
start()
{
echo -n "Starting $DESC: $PROGNAME"
$DAEMON -f $CONFIG
echo "."
}
stop()
{
echo -n "Stopping $DESC: $PROGNAME"
# haproxy_pid=cat $PIDFILE
# kill $haproxy_pid
killall -9 haproxy
echo "."
}
restart()
{
echo -n "Stopping $DESC: $PROGNAME.."
killall -9 haproxy
echo "."
$DAEMON -f $CONFIG
echo -n "Starting $DESC: $PROGNAME.."
echo "."
}
case "$1" in
start)
start
;;
stop)
stop
;;
restart)
restart
;;
*)
echo "Usage: $SCRIPTNAME {start|stop|restart}" >&2
exit 1
;;
esac
exit 0
8. Reference
一、
以上的設定在Real Server上看到的ip是帶HAProxy Server的ip,若要在Real Server 上看到實際連進來Client IP,需要Redhat 6.0以上,詳細資訊詳見以下的說明:
1.http://www.pigo.idv.tw/archives/989 -->中文
2.http://blog.loadbalancer.org/configure-haproxy-with-tproxy-kernel-for-full-transparent-proxy/ -->英文
二、Haproxy 安裝手記,版本升級並追加 log 機制
三、基于Keepalived+Haproxy搭建四层负载均衡器[原创]
四、官方網頁
五、參數設定說明
http://blog.longwin.com.tw/2009/03/haproxy-ha-load-balance-2009/
http://rritw.com/a/bianchengyuyan/PHP/20130301/314828.html
http://rritw.com/a/bianchengyuyan/PHP/20130301/314828.html
六、附Haproxy演算法:
一、roundrobin,表示簡單的輪詢;二、static-rr,表示根據權重;三、leastconn,表示最少連接者先處理;四、source,表示根據請求源IP;五、uri,表示根據請求的URI;六、url_param,表示根據請求的URl參數’balance url_param’ requires an URL parameter name七、hdr(name),表示根據HTTP請求頭來鎖定每一次HTTP請求;八、rdp-cookie(name),表示根據據cookie(name)來鎖定並哈希每一次TCP請求。
常用算法:roundrobin、source、lestconn。


